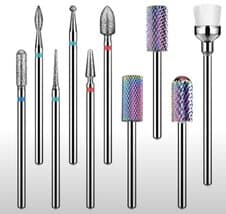
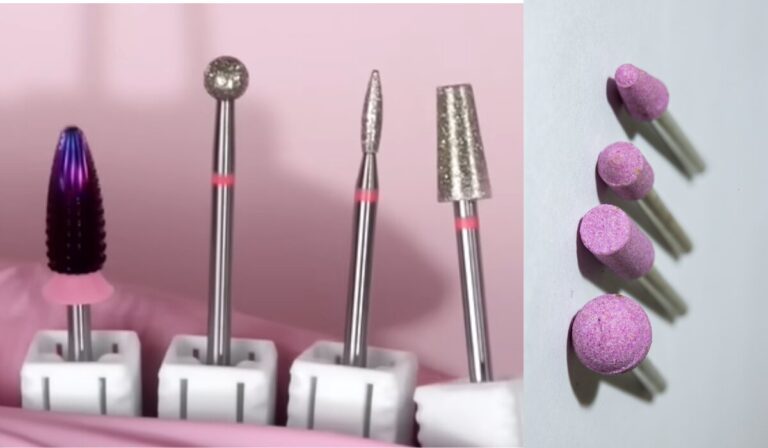
Which nail drill bits to use for best results, this thought creates curiosity in everyone’s mind. Nail drill bits are considered professional products for manicure and pedicure and are very important accessories. These small but effective accessories are designed to fit into electric nail drills, enabling technicians to shape, clean and smooth nails instead of using files. Each bit is designed for a specific task.
It’s good to know in advance what kind of work each of the bits does.
- Pushing cuticles back
- Filing or ridging gel polish off
- Filing acrylics
- Un-noticing shine under the nail
- Smoothing the nail surface
They are available in different materials, including carbide, ceramics, and diamond, each of which has advantages. Carbide bits, as their name suggests, are very hard and are well suited for cutting through thick artificial nails at a very fast pace.
Ceramic produces less heat, making it ideal for sensitive nails, and diamonds are long-lasting and ideal for detailed work. Selecting the appropriate nail drill bits enhances the quality of the manicure while protecting the nail bed’s health; thus, their selection is vital for anyone in the nail business. This way, the qualities, features, and benefits of the bits that suit you are underscored, and you can decide which is appropriate for you.
Types of Materials Used in Nail Drill Bits:
Nail drill cutters can be manufactured from various materials, and each material has advantages when used in nail treatment. Knowledge about such differences will assist the technician in selecting the right cutting tool for the right job and ensure safer manicures and pedicures.
Carbide Bits: Carbide nail drill bits are among the most used because of their toughness and hardness. They are mostly preferred when thicker enhancements, such as acrylics and gels, need to be sculpted and reduced in size. Due to their hard nature, carbide bits provide enhanced cutting capability along the material’s surface, reducing material quickly while minimizing heat generation.

Ceramic Bits: Most nail technicians prefer heat-proof or high-heat ceramic bits, particularly if their customers have a fever-like sensitivity to heat. These bits get somewhat heated during use but do not get hot, so the clients’ comfort is intact. Ceramic bits are also cut on the natural nail using low abrasiveness, hence their preference in defining and modeling the nail surface.
Diamond Bits: These bits are developed to apply a thin coat of fine diamond dust. They are very strong and perfect for intricate work. Diamond bits are useful for under the cuticle and the client’s nail border and for more detailed work such as engraving. Diamond bits are very durable because of their hardness relative to drill steel, which is good value even though they are usually more costly.
Both come in different varieties for certain tasks and nail types, so it is up to the nail technicians to select them wisely and effectively according to the goal of the manicure or pedicure. Knowledge of these materials is useful in choosing the right instrument for effective and secure manicure and nail grooming.
Understanding Different Shapes and Their Purposes:
In this area, the home of the nail drill bits goes deeper than meets the eye because its hoe delimits the function or work for which the particular nail drill bit deactivates and is best suited for use in manicure and pedicure practices. Every shape of the stone is designed to work effectively in a certain way – to work on the cuticle, to shave off material. Here’s a breakdown of common nail drill bit shapes and their primary uses: Here’s a breakdown of common nail drill bit shapes and their primary uses:
Cylinder Bits: These bits look like cylinders and are mainly used on the nail surface and sidewalls. They are flat and ideal for sharpening the ends to perfect the tops of the nails, particularly the acrylic overlay ones. Cylinder bits are also useful when preparing the nail for other treatments, such as applying Gel.
Cone Bits: Cone-shaped bits are blunt at the end and recommended for cleaning under the nails and other small and specific areas. They are maneuverable in the regions that seem hard to reach and, hence, suitable for cleaning around the nail bed and the cuticles.
Tapered Bits: These universal bits are less tapered than cone bits. They allow for precise work around cuticles and on the natural nail, which requires little stress for modification. They can be implemented for washing and polishing and are particularly gentle for sensitive nail areas.
Flame Bits: These are named after a small flame-like shape. They are perfect for intricate work that may be close to the cuticles and for removing overgrown cuticles and dead skin cells. They will not harm the natural nail when they come into contact with it, making them ideal for use when performing cuticle exercises.
Ball Bits: Spherical, these small cone-shaped bits are ideal for smoothening around the nail bed and cuticles. They are very useful in smoothing out sharp edges of hard-to-reach areas without causing any scratch or dent on the nail head.
Specialty Nail Drill Grit for Targeted Tasks: Types of Grits:
Coarse Grit: These bits are generally specified by grit numbers between 80 and 100. They are used for tough tasks, such as quickly eliminating as many layers of acrylics as possible or significantly decreasing the gels’ thickness of nails. All the coarse grit bits must be used carefully to prevent scratching the natural nail or to ensure they do not get too hot, which causes discomfort and even burns.
Medium Grit: Medium grit bits have grit numbers varying from 120 to 180 and are relatively less sharp than coarse grits. They are useful for shaping and emerging nail surfaces for all types of nails, especially those with thick nail enhancements. Medium grit is also ideal for preparing the nail for subsequent treatments, such as polishing it with Gel.
Fine Grit: Finishing uses finer grit bits, usually between 180 and 240 and even higher. They are useful in smoothening the nail’s surface and are fairly mild enough to be used on natural nails. Fine grit shapes, smoothing, and prepares the nail for a mirror-like shine.
Choosing the Right Grit:
Assess the Task: Environmental Analysis NOTE: How can we use the above four perspectives to determine what needs to be done? Abrasive papers with a Coarse classification are ideal for the workpiece’s initial cutting and rough shaping. At the same time, the Medium type is most suitable for normal shaping, and the Fine type can be used for the last polishing stages.
Consider the Nail Type: When filing natural nails, one should consider using finer grits that will not harm them, while coarser grits can be used on enhanced or strengthened nails.
Client Comfort: The welfare of the client should always be considered, especially when using coarser grits that may generate heat.
Hygiene and cleanliness are paramount with these tools; hence, you must get the correct manner to maintain and care for your nail drill bits. Following each use, you should clean the bit with a clean, soft-bristled brush that will remove any debris on it. To disinfect the bits, place the bits in a solution that you purchase from the market, which is specially made for soaking the faux fur and other materials, but ensure that you adhere to the required time that the material requires to soak in the solution to prevent damaging the faux furs used in the creation of the bits.
This makes appropriate use of harsh chemicals that may cause corrosion of the metal bits inapplicable. Also, after a certain amount of usage, one should check the inspected bits for dullness or irregular surfaces and replace them if necessary. It is also crucial to store the candles properly in a cool and clean environment and away from moisture so they do not rust. These steps are useful for maintaining and preserving the nail drill bits, creating a safe and effective manicure.
That common mistake should not be made:
Several mistakes should not be made with nail drill bits because they affect the quality of the manicures and the health of the client’s nails. Here are some key errors to avoid: Here are some key errors to avoid:
Using Too High a Speed: Working at the speed of the drill can cause a lot of heat and discomfort. It also exposes the nail technician to chemicals spilling on the nail, thereby inflicting harm on the client or even damaging the nail.
Incorrect Bit for the Material: If you apply a sharp and suitable bit to natural nails, this will result in thinning and weakening of the nail. On the other hand, using a fine bite on enhancements such as acrylics may prove to be very inefficient and time-consuming.
Not Changing Bits Often Enough: Bright pieces work efficiently and erode the nail surface, while dull or worn-out bits need to be fixed. They should also ensure that the bits are inspected and replaced frequently for efficient performance.
Ignoring Hygiene: As we all know, when using bits for financial reasons on two or more clients, it is very important to ensure they are cleaned and disinfected before the next client uses them; this may need to be done properly, causing contamination.
Skipping Training: Lack of proper training on how to use different bits means that you will likely use them incorrectly, which will result in a wrong result and might harm the nail.
Last word-It is therefore very important to chose on the correct nail drill bits to take our manicuring skills to the next level. Be it when preparing the nail bed, when removing enhancements or when doing fine detailing there is a bit for that. Do not forget to estimate the job that you are to do, and then determine the right sort of bit material and grit you are to choose. With the appropriate equipment, your manicures not just will look superior but also delivers the goal faster and safer to the nail.
Thanks-

